DIY Guide: Installing a Ceiling Fan for a Cool and Comfortable Home


How to Install a Ceiling Fan: A DIY Guide

Installing a new ceiling fan can seem like a daunting task, but with the right know-how and tools, it’s a manageable DIY project. Whether you’re looking to upgrade an existing fan or install a new one, follow these steps to ensure a successful and safe installation.

Step 1: Choose the Right Fan

The first step in installing a ceiling fan is choosing the right one for your space. Look for a fan that is appropriately sized for the room, with enough blade span and the correct hanging height. This information can usually be found on the fan’s packaging or in the manufacturer’s instructions.

Step 2: Turn Off the Power

Before you start any electrical work, it’s important to turn off the power to the existing ceiling fixture. This can usually be done at the circuit breaker. If there is no existing fixture, or if you’re unsure how to turn off the power, it’s best to hire a professional electrician.

Step 3: Remove the Existing Fixture

If there is an existing ceiling fixture, remove it carefully. Make sure to keep track of all screws and other hardware, as you may need them later. If there is no existing fixture, you may need to hire an electrician to run the new wiring.

Step 4: Attach the Mounting Bracket

Once the power is off and the existing fixture is removed, it’s time to attach the mounting bracket to the electrical box. Make sure to use the hardware provided with the fan, as other hardware may not be strong enough to support the weight of the fan. Follow the manufacturer’s instructions carefully to ensure a proper and secure installation.

Step 5: Assemble the Fan

With the mounting bracket in place, it’s time to assemble the fan. Follow the manufacturer’s instructions carefully, and make sure all parts are securely fastened. This includes the motor, blades, and any light fixtures that may be included with the fan. Take your time to ensure that everything is assembled correctly.

Step 6: Attach the Fan Blades

Once the fan is assembled, it’s time to attach the blades. Most fans will have a specific blade orientation, so make sure to follow the manufacturer’s instructions carefully. Use the hardware provided to attach the blades securely to the motor.

Step 7: Turn the Power Back On

Before turning the power back on, make sure that everything is securely in place and that there are no loose wires or other hazards. Once you’re confident that the fan is installed correctly, turn the power back on and test the fan’s operation. Make sure that it’s spinning in the right direction and that all speeds and functions are working properly.

Once the fan is installed, you can sit back and enjoy the comfort it provides. Ceiling fans can help reduce energy costs by making it more efficient to cool or heat a room. In the summer, ceiling fans can create a cooling breeze, allowing you to set the thermostat a few degrees higher without sacrificing comfort. In the winter, running the fan in reverse can help circulate warm air and reduce heating costs.

If you’re not confident in your ability to install a ceiling fan, don’t hesitate to call in a professional like Diego Does It. A professional handyman can ensure that the installation is done correctly and safely, saving you time and potential headaches.

So, whether you’re looking to improve your home’s energy efficiency or just want to update the look of a room, installing a ceiling fan is a great option. With the right tools, a little bit of know-how, and some careful attention to detail, you can install a ceiling fan that will provide comfort and beauty for years to come.

A Step-by-Step Guide to Refinishing Kitchen Cabinets | Diego Does It

Refinishing Kitchen Cabinets: A DIY Guide

Refinishing your kitchen cabinets is a cost-effective way to give your kitchen a brand-new look without having to replace the entire cabinets. Whether you want to change the color of your cabinets or just want to give them a fresh new coat of paint, refinishing them is a DIY project that can be completed in a weekend.

Step 1: Remove Cabinet Doors, Drawers, and Hardware

The first step is to remove all cabinet doors, drawers, and hardware. This will make the refinishing process much easier and allow you to get a more even finish on all surfaces. Use a screwdriver to remove the hardware and set it aside in a safe place.

Step 2: Clean the Surfaces

Next, thoroughly clean the surfaces to remove any dirt or grease. Use a degreaser or a mixture of warm water and dish soap to clean the cabinets. Rinse the surfaces with clean water and let them dry completely.

Step 3: Sand the Surfaces

Use sandpaper or a sanding block to lightly sand the surfaces of the cabinets. This will create a smooth surface for the new finish to adhere to. Be sure to sand in the direction of the wood grain and wipe away any dust with a clean cloth or tack cloth.

Step 4: Apply Primer (Optional)

If you want to change the color of your cabinets, apply a coat of primer before painting. This will help the new paint adhere better and provide a more even finish. Apply the primer with a brush or a paint sprayer and let it dry completely before moving on to the next step.

Step 5: Apply Paint

Once you’ve applied the primer (if necessary), you can start painting. Use a paint sprayer for a smooth, professional finish, or use a paint roller and brush if you don’t have access to a sprayer. Apply the paint in thin, even coats, and be sure to let each coat dry completely before applying the next one. For best results, apply a minimum of two coats of paint.

Step 6: Reattach Doors, Drawers, and Hardware

After the paint is dry, you can reattach the cabinet doors and drawers and install new hardware for a finished look. Make sure the paint is completely dry before reattaching the hardware to prevent any smudging or damage to the new finish.

Refinishing your kitchen cabinets is a simple and affordable way to give your kitchen a fresh new look that you can enjoy for years to come. Follow these easy steps and you’ll have a kitchen that looks brand new in no time!

Ready to start your kitchen cabinet refinishing project? Contact Diego Does It, your trusted handyman in Austin, TX, for all your home improvement needs!

A Step-by-Step Guide to Installing a New Faucet | Diego Does It

How to Install a New Faucet in Your Kitchen or Bathroom

Installing a new faucet is a great way to update your kitchen or bathroom without spending a lot of money. Whether you’re replacing a broken faucet or just want a fresh new look, installing a new faucet can be done in just a few easy steps. Here’s how:

Step 1: Turn Off the Water Supply

The first step is to turn off the water supply valves under the sink. This will prevent any water from flowing while you’re working on the faucet. Once the water is turned off, turn on the faucet to relieve any pressure in the lines.

Step 2: Remove the Old Faucet

Next, disconnect the old faucet from the water supply lines and remove it from the sink. This may require a basin wrench or other plumbing tools. Once the old faucet is removed, clean the sink and make sure the surface is smooth and free of any debris.

Step 3: Install the New Faucet

Insert the gasket and mounting plate onto the new faucet and lower it into the sink. Tighten the mounting nut with a basin wrench, and then connect the water supply lines to the faucet. Be sure to follow the manufacturer’s instructions for any specific requirements or recommendations.

Step 4: Test for Leaks

Finally, turn on the water supply and test the new faucet for any leaks. If you notice any leaks, tighten the connections as needed. Once you’re sure the faucet is working properly, clean up any excess water and enjoy your new faucet!

Installing a new faucet can seem intimidating, but with a little bit of patience and attention to detail, you can successfully install a new faucet on your own and improve the functionality and appearance of your kitchen or bathroom.

Conclusion

At Diego Does It, we understand that not everyone has the time, tools, or expertise to take on home improvement projects like installing a new faucet. That’s why we’re here to help! Our experienced team of handymen can tackle any project, big or small. Contact us today to schedule your appointment.

How to Refresh Your Kitchen or Bathroom Cabinets: A Guide to Replacing Cabinet Hardware

Replacing Cabinet Hardware: A Simple and Inexpensive Upgrade

Replacing cabinet hardware is a simple and inexpensive way to give your kitchen or bathroom a fresh new look. You can choose from a wide range of styles and finishes to match your decor, and it only takes a few minutes to install each piece.

Choosing New Hardware

Start by measuring the distance between the screw holes on your old hardware so you can choose new knobs or pulls that fit perfectly. Keep in mind that the size of the new hardware may be different from the old hardware, so be sure to measure carefully. Once you have the measurements, you can start looking for new hardware that matches your style and budget.

Removing the Old Hardware

Once you have your new hardware, it’s time to remove the old hardware. Begin by unscrewing the old hardware from the cabinet doors or drawers. If the old hardware has been in place for a long time, you may need to use a bit of force to remove it. Be careful not to damage the wood surface while doing so.

Preparing for the New Hardware

If the new hardware has a different hole placement, use a putty knife to fill the old holes with wood filler and let it dry completely. Once it’s dry, sand it smooth and drill new holes in the correct location. Be sure to measure carefully and mark the spot before drilling.

Attaching the New Hardware

Finally, attach the new hardware by inserting the screws and tightening them with a screwdriver. Be sure not to overtighten the screws as this can damage the wood. Once all of the hardware is in place, step back and admire your work! Your cabinets have a fresh new look.

Conclusion

Replacing your cabinet hardware is a simple and affordable upgrade that can transform the look of your kitchen or bathroom. With a wide range of styles and finishes to choose from, it’s easy to find hardware that matches your decor and fits your budget. If you’re looking for a professional to help with your cabinet hardware replacement, contact Diego Does It, your trusted handyman in Austin, TX. We’re here to help with all of your home improvement needs!

Don’t wait, start your cabinet hardware upgrade today!

Close-up of newly installed cabinet hardware
Fresh new look for your cabinets with updated hardware.

A Comprehensive Guide to Installing a Programmable Thermostat | Diego Does It

How to Install a Programmable Thermostat

If you’re looking to reduce your energy bills and make your home more comfortable, installing a programmable thermostat is a great way to achieve that. With a programmable thermostat, you can set the temperature to automatically adjust based on your schedule and preferences, without having to constantly adjust it manually. This not only makes your home more comfortable but also reduces your energy usage, saving you money in the long run.

Choosing the Right Thermostat

The first step in installing a programmable thermostat is choosing the right one for your home. Consider your current thermostat and ensure that the new one you choose is compatible with your HVAC system. Programmable thermostats come in a range of types, including:

  • 7-day programming
  • 5+2 day programming
  • 5-1-1 programming

Each type has its own unique programming features, so it’s important to choose the one that best suits your schedule and lifestyle.

Installation

Once you’ve chosen the right thermostat, the next step is installation. You can follow the manufacturer’s instructions for installation or hire a professional handyman like Diego Does It to ensure proper installation. It’s important to note that if you’re not familiar with electrical wiring, it’s best to leave the installation to a professional.

Before you start, turn off the power to your HVAC system at the circuit breaker. Remove your old thermostat and label the wires according to the terminal they were attached to. This will make it easier to install the new thermostat.

Next, mount the new thermostat base to the wall and connect the wires to their corresponding terminals. Once the wires are connected, attach the thermostat faceplate and turn the power back on. Follow the manufacturer’s instructions for programming your thermostat to your desired schedule and preferences.

Benefits of a Programmable Thermostat

Installing a programmable thermostat offers a range of benefits, including:

  • Reducing energy bills
  • Making your home more comfortable
  • Reducing energy usage and carbon footprint
  • Providing more accurate temperature control
  • Allowing remote temperature control through a mobile app or smart home device

Overall, installing a programmable thermostat is a simple and effective way to improve your home’s energy efficiency and comfort. If you’re not comfortable with the installation process, consider hiring a professional handyman like Diego Does It to ensure proper installation and maximize the benefits of your new thermostat.

A Complete Guide to Painting a Room: Tips and Techniques for DIYers | Diego Does It

Introduction

Are you tired of the same old paint color in your home? Want to give your space a fresh new look? Painting a room is an easy and affordable way to transform your home. With the right tools and some basic know-how, anyone can learn how to paint a room like a pro. In this guide, we’ll walk you through each step of the process, from choosing the right paint to preparing the walls and applying the final coat. Let’s get started!

Choosing the Right Paint

Choosing the right paint is essential to achieving the perfect look for any room in your home or office. When it comes to painting, there are many options to consider, from the type of paint finish to the color and tools needed for the job. In this guide, we’ll walk you through everything you need to know about choosing the right paint for your next project.

Types of Paint Finishes

One of the first decisions you’ll need to make is what type of paint finish to use. Here are a few options to consider:

  • Matte: This finish has a non-reflective appearance and works well to hide imperfections on walls and ceilings. It’s ideal for low-traffic areas.
  • Eggshell: A step up from matte, eggshell finish has a slight sheen and is easier to clean, making it a great choice for living rooms and bedrooms.
  • Satin: A satin finish has a bit more shine and is highly durable. It’s an excellent choice for high-traffic areas such as hallways and kitchens.
  • Semi-Gloss: This finish has a high shine and is easy to clean, making it an ideal choice for bathrooms and kitchens.

Consider the look and feel you want to achieve when selecting your paint finish.

Color Options and Considerations

When it comes to choosing a paint color, the options can be overwhelming. Here are some tips to help you choose:

  • Consider the room: Think about the function of the room and the mood you want to create. For example, a warm color like red or orange can create a cozy feel in a living room, while a cool color like blue or green can make a bedroom feel more relaxed.
  • Think about lighting: The amount of natural light a room receives can affect how a color appears. Test out paint swatches in different areas of the room to see how the color changes throughout the day.
  • Consider the furniture: If you have a lot of furniture in the room, consider choosing a paint color that complements the existing pieces.

Keep in mind that paint colors can appear differently on a computer screen than they do in real life, so it’s always a good idea to test out paint samples before committing to a color.


Preparing the Room for Painting

Before you begin painting, it’s important to prepare the room to ensure that the painting process goes smoothly. Here are a few things you should do:

Clearing out the room

The first step in preparing the room for painting is to clear out any furniture, decor, and other items that may get in the way. This will give you plenty of space to work and help prevent any accidental paint spills or damage to your belongings. If you can’t move larger items out of the room, move them to the center of the room and cover them with a tarp or plastic sheeting.

Covering the floors and furniture

Once you’ve cleared out the room, the next step is to cover the floors and any remaining furniture to protect them from paint splatters and spills. Use a canvas drop cloth or plastic sheeting to cover the floors and any furniture that couldn’t be moved out of the room. Make sure to tape down the edges of the drop cloth to prevent it from moving or shifting during the painting process.

Repairing any damage to the walls

Before you start painting, take the time to inspect the walls for any damages such as cracks, holes, or dents. Repairing these damages before painting will help ensure a smooth, professional-looking finish. Use spackle and a putty knife to fill in any holes or cracks, then sand the area smooth once it’s dry. If there are any larger holes or damaged areas, consider using a drywall patch kit to make the repairs.

By taking the time to properly prepare the room for painting, you can help ensure a successful painting project and protect your belongings from accidental paint spills or damage. In the next section, we’ll discuss the steps for priming the walls before painting.

Prepping the Walls for Painting

Before you start painting, it’s important to prepare the walls to ensure a smooth and even finish. Here are the steps to follow:

Cleaning the Walls

Begin by cleaning the walls with a sponge or cloth and a mild detergent solution. This will remove any dirt, grease, or grime that may prevent the paint from adhering properly. Be sure to rinse the walls thoroughly and allow them to dry completely before moving on to the next step.

Sanding the Walls

If there are any rough or uneven areas on the walls, sand them down with fine-grit sandpaper. This will create a smooth surface for the paint to adhere to. Be sure to wipe away any dust or debris with a damp cloth before moving on to the next step.

Applying Primer

Before you start painting, it’s recommended to apply a coat of primer to the walls. This will help the paint to adhere better and will also ensure a consistent finish. Use a brush or roller to apply the primer evenly to the walls and allow it to dry completely before starting the actual painting process.

By following these steps, you can ensure that your walls are properly prepped for painting, which will result in a professional-looking finish.

Painting Techniques and tips

When it comes to painting a room, there are a few techniques and tips you can use to make the process smoother and more efficient. One important technique is to use a paint roller with an extension pole to reach high areas and cover large surfaces quickly. Another tip is to use painter’s tape to create clean lines and prevent paint from bleeding onto adjacent surfaces. Additionally, consider using a paint grid or tray to evenly distribute paint and avoid overloading your roller.

Other painting techniques and tips include using a high-quality brush for detail work, cutting in (painting a straight line along edges and corners) before rolling, and using a wet edge technique to avoid visible brush and roller marks. Don’t forget to take breaks as needed to avoid fatigue and ensure that you’re working with a steady hand.

A step-by-step guide to painting the room

Now that you’ve prepped your walls, it’s time to start painting. Follow these steps for a successful paint job:

  1. Start by cutting in around the edges of the room, using a brush or edger tool to paint a straight line along the ceiling, baseboards, and corners. Take your time and use painter’s tape if needed to create clean, sharp lines.
  2. Next, pour your paint into a paint grid or tray and use a roller to cover the larger areas of the wall. Be sure to use long, even strokes and avoid pressing too hard on the roller to prevent roller marks.
  3. Once you’ve finished rolling, go back and use a brush to touch up any missed spots or areas where the roller couldn’t reach. This is also a good time to paint any trim or molding in the room.
  4. Allow the first coat of paint to dry completely before applying a second coat. Follow the same steps as before, cutting in first and then rolling on the paint.
  5. After the second coat is dry, inspect the walls for any missed spots or imperfections. Use a brush to touch up as needed, and allow the paint to dry completely before removing painter’s tape and moving furniture back into the room.

Dealing with mistakes and touch-ups

Even the most careful painters can make mistakes or encounter issues during the painting process. Fortunately, most mistakes can be easily fixed with touch-up paint or a few simple techniques. For example, if you accidentally get paint on a nearby surface, try wiping it off with a damp cloth or using a razor blade to gently scrape it away.

If you notice brush or roller marks on the wall, try lightly sanding the area with a fine-grit sandpaper and then repainting with a small brush or roller. If you’re dealing with drips or runs, wait for the paint to dry completely and then sand the area smooth before repainting.

Finally, always keep a can of touch-up paint on hand in case of any future scratches, scuffs, or damage to the walls. This will help you quickly and easily cover up any imperfections and keep your walls looking fresh and new.

Finishing the Job

Once you’ve finished painting the room, it’s time to give yourself a pat on the back and admire your hard work. But before you do, there are a few more things you need to take care of.

Cleaning up the Painting Supplies

Start by cleaning up your painting supplies. You’ll need to properly clean your brushes, rollers, and any other tools you used. If you used water-based paint, warm soapy water should do the trick. For oil-based paints, you’ll need to use a solvent like mineral spirits. Be sure to follow the manufacturer’s instructions for cleaning your specific paint products.

Removing the Tape and Coverings

After the paint has dried completely, remove any tape and coverings that you used to protect the floors, trim, and other surfaces. Be careful when removing the tape to avoid peeling off any paint along with it. Use a sharp utility knife to cut the tape where it meets the painted surface to ensure a clean removal.

Admiring Your Finished Room

Now that you’ve cleaned up and removed all the coverings, take a step back and admire your finished room. You did it! Enjoy the new look of your space and the satisfaction of a job well done.

At Diego Does It, we understand that painting a room can be a daunting task. But with the right tools, techniques, and guidance, anyone can do it themselves. Of course, we also understand that not everyone feels comfortable taking on a project like this. That’s where we come in!

If you don’t feel confident in your ability to paint a room or simply don’t have the time, you can always schedule a painting service with Diego Does It. Our team of experienced handymen can help you achieve the perfect look for your home, hassle-free.

Whether you choose to do it yourself or let us handle it, we hope this guide has been helpful in your journey to a beautifully painted room. Happy painting!

How to Install Light Fixtures: A Comprehensive Guide | Diego Does It

How to Install Light Fixtures: A Comprehensive Guide

Are you tired of your old, outdated light fixtures? Upgrading to new fixtures can bring new life to your home or office space. In this guide, we will walk you through the process of installing light fixtures. Whether you’re replacing an old fixture or installing a new one, we’ve got you covered.

Choosing the Right Light Fixture

Before you start the installation process, you need to choose the right light fixture. Here are a few things to consider when selecting a new light fixture:

  • Style: Choose a fixture that complements your home or office decor.
  • Size: Make sure the fixture is the right size for the room. A small fixture in a large room will look out of place, and a large fixture in a small room will overpower the space.

  • Functionality: Consider the purpose of the room and the type of lighting you need. Do you need bright, focused light or a soft, ambient glow?
  • Energy Efficiency: Look for fixtures that are energy-efficient to help you save on your electricity bill.

Once you’ve selected the right fixture, you can move on to the installation process.

Removing the Old Fixture

The first step in installing a new light fixture is to remove the old one. Here’s how to do it:

  1. Turn off the power: Go to your circuit breaker box and turn off the power to the room where the fixture is located.
  2. Remove the fixture cover: Most fixtures have a cover that conceals the mounting bracket. Remove the cover by unscrewing the screws that hold it in place.
  3. Disconnect the wiring: Once you have access to the wiring, disconnect the wires by unscrewing the wire connectors that hold them together. Make note of which wires are connected together, as you will
    l need to reconnect them when you install the new fixture.
  4. Remove the mounting bracket: Use a screwdriver to remove the screws that hold the mounting bracket in place. Once you have removed the bracket, the old fixture should come loose.

Installing the New Fixture

Now that you’ve removed the old fixture, it’s time to install the new one. Follow these steps:

  1. Attach the mounting bracket: Hold the new mounting bracket against the ceiling and use screws to secure it in place.
  2. Connect the wiring: Match the wires from the new fixture to the wires from the ceiling. Twist the wires together and secure them with wire connectors.
  3. Attach the fixture: Once the wiring is connected, attach the fixture to the mounting bracket using screws.
  4. Install the cover: Finally, install the cover over the fixture and use screws to secure it in place.

If you’re not comfortable doing the installation yourself, don’t hesitate to schedule an appointment with us!

10 DIY Home Improvement Projects You Can Tackle This Weekend

General Handyman Services


10 DIY Home Improvement Projects You Can Tackle This Weekend

Introduction

Are you tired of paying high prices for home repairs and improvements? Look no further! In this blog post, we’ll share some easy DIY home improvement projects that you can complete on your own. Not only will you save money by doing these projects yourself, but you’ll also increase the value of your home. No need to hire expensive contractors, all you need is a little bit of time and some basic tools. So grab your toolbox and let’s get started! Don’t forget to share your success stories with us and schedule your next home improvement project with Diego Does It.

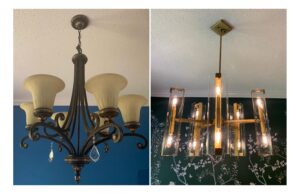
Project 1: Installing a new light fixture

Installing a new light fixture is a great way to add some style to your home while also improving functionality. But with so many options available, it can be overwhelming to choose the right one. When selecting a new light fixture, consider the style and design of your home, as well as the purpose of the room where the fixture will be installed. A new light fixture can completely change the ambiance of a room, making it feel brighter and more spacious. Additionally, replacing an outdated or inefficient fixture with a new one can also improve energy efficiency and save money on your electricity bill. If you’re feeling up to the task, installing a new light fixture can be a simple DIY project that can be completed in just a few hours with the right tools and instructions. For more info click here

Project 2: Paint a room

Painting a room is one of the most cost-effective ways to give your home a fresh new look. Whether you’re looking to brighten up a dull space or add a splash of color, painting can make a big impact. Before you start, it’s important to choose the right color and type of paint. Consider the room’s purpose and the mood you want to create. For example, soft and neutral colors are ideal for bedrooms, while bright and bold colors work well in living rooms or playrooms. When painting, be sure to properly prepare the surfaces by cleaning, sanding, and priming as needed. Use painter’s tape to protect baseboards and trim, and use a high-quality brush and roller for a smooth finish. Don’t forget to open windows and use fans to help with ventilation, and be sure to give the paint ample time to dry between coats. With a little bit of effort, painting a room can be a fun and rewarding DIY project for any homeowner. For more info click here

Project 3: Installing a programmable thermostat

If you’re looking to reduce your energy bills and make your home more comfortable, installing a programmable thermostat is a great way to achieve that. With a programmable thermostat, you can set the temperature to automatically adjust based on your schedule and preferences, without having to constantly adjust it manually. This not only makes your home more comfortable but also reduces your energy usage, saving you money in the long run. To get started, consider your current thermostat and ensure that the new one you choose is compatible with your HVAC system. Then, follow the manufacturer’s instructions for installation or hire a professional handyman like Diego Does It to ensure proper installation. Once installed, you can program your thermostat to adjust the temperature based on your desired schedule and preferences. Overall, installing a programmable thermostat is a simple and effective way to improve your home’s energy efficiency and comfort. For more info click here

Project 4: Replacing Cabinet Hardware

Replacing cabinet hardware is a simple and inexpensive way to give your kitchen or bathroom a fresh new look. You can choose from a wide range of styles and finishes to match your decor, and it only takes a few minutes to install each piece.

Start by measuring the distance between the screw holes on your old hardware so you can choose new knobs or pulls that fit perfectly. Then, remove the old hardware by unscrewing it from the cabinet doors or drawers. If the new hardware has a different hole placement, use a putty knife to fill the old holes with wood filler and let it dry completely. Once it’s dry, sand it smooth and drill new holes in the correct location. Finally, attach the new hardware by inserting the screws and tightening them with a screwdriver.

Voila! Your cabinets have a fresh new look. And the best part is, this simple update won’t break the bank.

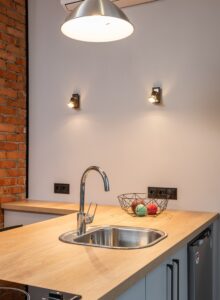
Project 5: Installing a New Faucet

Installing a new faucet can be a simple and cost-effective way to give your kitchen or bathroom a fresh look. Start by turning off the water supply valves under the sink and disconnecting the old faucet. Next, insert the gasket and mounting plate onto the new faucet and lower it into the sink. Tighten the mounting nut with a basin wrench, and then connect the water supply lines to the faucet. Finally, turn on the water supply and test the new faucet for any leaks. With a little bit of patience and attention to detail, you can successfully install a new faucet on your own and improve the functionality and appearance of your kitchen or bathroom.

Project 6: Weatherstripping doors and windows

Weatherstripping doors and windows is an easy and affordable way to improve energy efficiency in your home. It involves sealing gaps and cracks around doors and windows to prevent drafts and keep cool or warm air inside. This DIY project can save you money on your energy bills and make your home more comfortable year-round. To weatherstrip your doors and windows, first, identify any gaps or cracks. Then, choose the appropriate weatherstripping material based on the size and location of the gaps. Install the weatherstripping according to the manufacturer’s instructions, making sure it is snugly in place. Finally, test the doors and windows to ensure that they close and seal properly. With just a few simple steps, you can make a big difference in your home’s energy efficiency and comfort level.

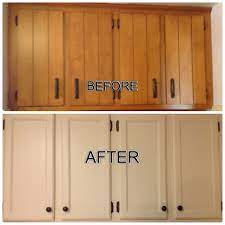
Project 7: Refinishing kitchen cabinets

Refinishing your kitchen cabinets is a cost-effective way to give your kitchen a brand-new look without having to replace the entire cabinets. Whether you want to change the color of your cabinets or just want to give them a fresh new coat of paint, refinishing them is a DIY project that can be completed in a weekend.

The first step is to remove all cabinet doors, drawers, and hardware. Then, thoroughly clean the surfaces to remove any dirt or grease. Next, sand the surfaces lightly to create a smooth surface for the new finish. If you want to change the color of your cabinets, apply a coat of primer before painting.

Once you’ve applied the primer, you can start painting. Use a paint sprayer for a smooth, professional finish, or use a paint roller and brush if you don’t have access to a sprayer. Allow the paint to dry completely between coats, and apply a minimum of two coats for best results.

After the paint is dry, you can reattach the cabinet doors and drawers and install new hardware for a finished look. Refinishing your kitchen cabinets is a simple and affordable way to give your kitchen a fresh new look that you can enjoy for years to come.

Project 8: Installing a ceiling fan

Installing a new ceiling fan may seem intimidating, but with a little know-how, it can be a manageable DIY project. First, you will need to choose the right type and size of ceiling fan for the room. Look for a fan that is appropriately sized for the space, with enough blade span and the correct hanging height. Next, turn off the power to the existing ceiling fixture and remove it. If there is no existing fixture, you may need to hire an electrician to run the new wiring. Then, attach the mounting bracket to the electrical box and assemble the fan according to the manufacturer’s instructions. It’s important to follow the instructions carefully to ensure the fan is assembled correctly. Finally, attach the fan blades and turn the power back on to test the fan’s operation. If you don’t feel comfortable with any of these steps, don’t hesitate to contact a professional handyman like Diego Does It. They can help with the installation and ensure your new ceiling fan is properly installed and functioning safely.

Project 9: Building a simple bookshelf

Building a bookshelf is another DIY home improvement project that can be tackled over the weekend. Not only will it provide a stylish storage solution for books and other items, but it can also be customized to fit the specific dimensions and style of a room. Before starting, it’s important to gather all necessary materials and

Project 10: Creating a gallery wall

Creating a gallery wall is a fun and creative way to showcase your favorite art pieces, photographs, and other decorative items. It can transform a boring and blank wall into a visually stunning display that reflects your unique style and personality. To create a gallery wall, start by selecting a theme or color scheme that ties everything together. It can be based on a particular artwork, color or pattern, or simply a common style.

Next, gather all the items that you want to display on the gallery wall. These could be art prints, photographs, posters, or even unique items such as hats or vintage signs. Arrange them on the floor first to get an idea of how you want them to be displayed. Play around with the arrangement until you find a design that works for you.

Once you have your layout finalized, start hanging the items on the wall. Use a level and measuring tape to ensure everything is straight and properly spaced. You can use nails, screws, or adhesive hooks depending on the weight of the items and the type of wall surface.

Remember, creating a gallery wall is all about experimenting and having fun. Don’t be afraid to mix and match different styles and sizes of art pieces to create a truly unique and personalized display. And if you ever need any assistance, feel free to contact Diego Does It for professional help in creating the perfect gallery wall for your home or office.

Benefits of DIY Home Improvement

Discuss the benefits of completing home improvement projects on your own, such as saving money and learning new skills.
Emphasize how DIY projects can be a fun and fulfilling way to improve your home.

DIY home improvement projects offer numerous benefits beyond just the satisfaction of a job well done. One of the most significant advantages is cost savings. By doing the work yourself, you can save money on labor costs and avoid the markup on materials that contractors charge. Additionally, taking on a DIY project is a great way to learn new skills and expand your knowledge of home repair and maintenance.

But DIY projects aren’t just practical – they can also be enjoyable and fulfilling. There’s a sense of pride and accomplishment that comes with completing a project with your own two hands and seeing the transformation of your home can be truly gratifying. Whether it’s adding a fresh coat of paint or installing a new light fixture, each project gives you the opportunity to make your home uniquely your own.

Overall, tackling DIY home improvement projects is a smart way to save money, learn new skills, and create a home that you love. So don’t be afraid to roll up your sleeves and get to work – the rewards are well worth the effort.

Conclusion

In conclusion, completing DIY home improvement projects can provide numerous benefits for homeowners. It can save money, allow for creativity, and provide a sense of accomplishment. We encourage readers to try one or more of the easy projects outlined in this post, and to consider scheduling an appointment with Diego Does It for larger or more complicated projects. Don’t be afraid to tackle home improvement projects on your own and discover the joys of DIY.

How to Mount a TV: A Handyman’s Guide


How to Mount a TV: A Handyman’s Guide

Mounting a TV on the wall is a great way to save space and improve your viewing experience. However, it can be a bit tricky if you’re not familiar with the process. In this guide, we’ll walk you through the steps to mount your TV on the wall like a pro.

Step 1: Choose the Right Location

The first step in mounting a TV is to choose the right location. You’ll want to choose a spot that’s at eye level when you’re sitting down and provides a good viewing angle. Make sure to also consider the location of your power outlet and cable connections.

Step 2: Gather Your Tools and Materials

Before you start mounting your TV, you’ll need to gather the necessary tools and materials. Here’s what you’ll need:

  • Stud finder
  • Drill
  • Screws
  • Wall mount bracket
  • Level

Step 3: Find the Studs

Once you’ve chosen the location for your TV, use a stud finder to locate the studs in the wall. This is important because you’ll want to mount your TV on a stud for added stability.

Step 4: Install the Wall Mount Bracket

Using your drill and screws, install the wall mount bracket onto the wall, making sure to screw it into the studs you located in the previous step. Use a level to ensure that the bracket is straight.

Step 5: Attach the TV to the Bracket

With the wall mount bracket securely in place, you can now attach the TV to the bracket. Make sure to follow the manufacturer’s instructions for attaching the TV to the bracket.

Contact Diego Does It for Help Mounting Your TV

If you’re not comfortable mounting your TV on your own, contact Diego Does It. Our team of experienced handymen can help you mount your TV quickly and efficiently. Contact us today to schedule an appointment!


Handy Tips for Hanging Curtains and Choosing the Right Length


Handy Tips for Hanging Curtains and Choosing the Right Length


Measuring your windows

To determine the right length, measure your window’s width and height. Curtains should hang just above the floor for a standard look. But, you can choose a shorter or longer length depending on your preference. For the best results, trust our experienced Austin handyman service to handle your curtain installation.

Choosing the right type of curtain rod

There are several types of curtain rods to choose from. Standard rods are the most common and come in various styles and finishes. Tension rods are ideal for lightweight curtains, and traverse rods are great for heavier curtains. At “Diego Does it”, we can help you choose the perfect rod for your curtains.

Installing your curtain rod

Attach the brackets to the wall or window frame, ensuring they’re level. Slide the curtains onto the rod and place the rod onto the brackets. Adjust the curtains as needed to ensure they’re even and straight. If you don’t have the tools or experience to install your curtains, let “Diego Does it” handle it for you.


Hanging curtains is a simple DIY project that can add character to your Austin home. But, if you’re unsure, trust our Austin handyman service “Diego Does it” for professional curtain installation. Contact us today to schedule an appointment and let us take care of all your curtain hanging needs.